VISUALIZING MASS TIMBER
BRIDGE: ARTS & CRAFTS CO-HOUSING CASE STUDY
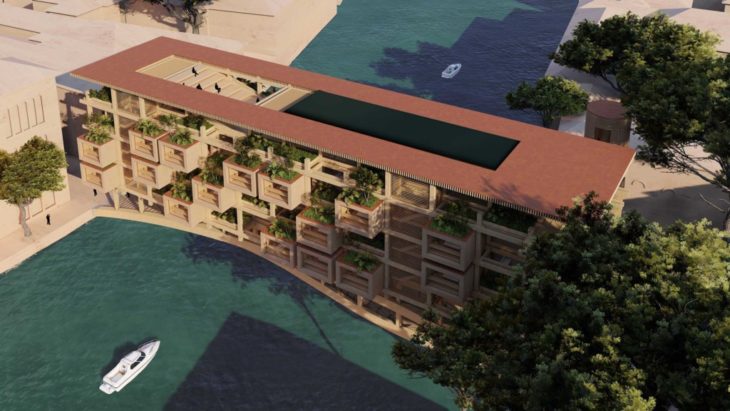
BIRD’S EYE VIEW OF THE GRAND CANAL AND THE HOUSING BRIDGE COMPLEX
The visualization process started by hierarchizing the basic geometry to rhino software. The model preparation is implemented throughout the following steps:
RHINO WORKFLOW
- Firstly we have to clean the model and organize the layers of the model and include each 3d geometry in a specific set of layers (such as foundation, structure, cladding etc).
- Then we have to create new custom materials and pick a color for each one.
- The next step is to apply each color material to specific 3d geometries so as to attach and edit the material to Lumion later.
- Finally, we have to start live sync between Rhino and Lumion so as to work in parallel.
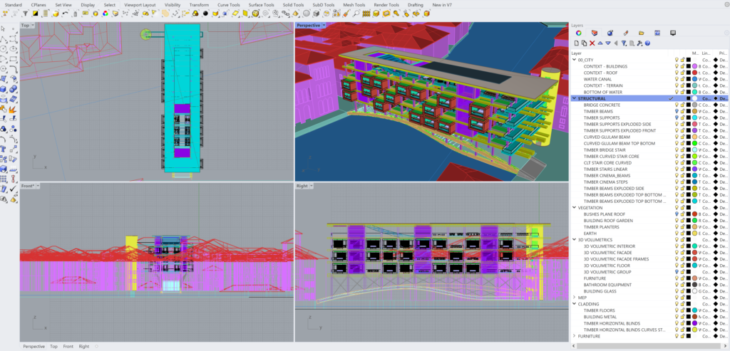
LAYERS ORGANISATION
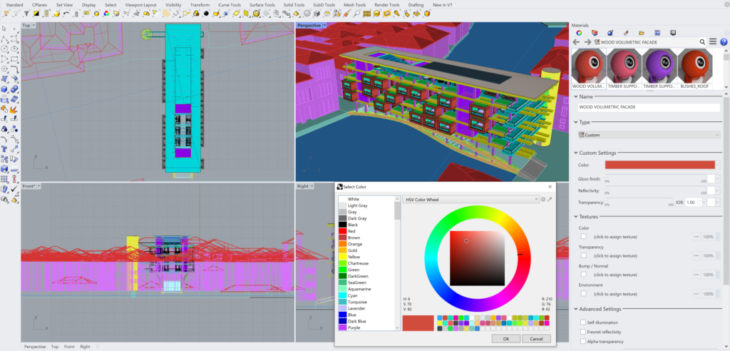
MATERIAL COLORS SELECTION AND GEOMETRY PLACEMENT
LUMION WORKFLOW
- When the model is synchronised it is located at zero level, so the first thing to do is to move the model up 10m.
- Then we open the ocean for the grand canal and edit the color, wave, turbidity and height of the water surface.
- Then we have to select each different material (which is grouped according to the Rhino color assigned) and create a new custom material by editing an existing one from the library or importing a new texture with color and normal map downloaded from online material libraries. At the material edit, we can fix the scale, rotation, and position of the texture (for example of the mass timber grain) to real scale. It is also possible to change the color temperature as well as to introduce effects such as weathering or foliage to give a more realistic view. A key aspect is to create different surface colors for the sides of an element at Rhino in order to apply different textures at Lumion. In this case, the most important aspect is to have different grains and surface textures for glulam and CLT surfaces according to the structural direction of main beams and supports. This creates a more realistic aspect of the mass timber building.
- After creating all the materials for the model, the next step is to import vegetation. Mainly we can create volumes at Rhino and import them as Collada files to Lumion and then replace the selection with selected trees. Alternatively, we can place new trees as a single, mass, cluster or paint placement at the surrounding and bushes and small trees at the roof garden of the mass timber 3d Volumentrics.
- The next step is to place vehicles and boats as well as 3d people and birds.
- At the render tab, we can create different effects for each camera stored. We can control the lens distance and vertical shift. We can use realistic rendering and import FX so as to choose between sun, weather, sky, camera effects such as the real skies, 2-point perspective, shadow effects, depth of field, color correction, and so on, and then render an image or a set of images by giving the right resolution.
- In addition, we can introduce in animation FX the move effect so as to create a path between starting and ending points of people, vehicles, and custom objects or use a mass move FX to create planes with 2way directions to allow the mass movement of people, vehicles and custom objects when entering the zone. The advanced move can be used to introduce the duration of the movement. Then we can create animations at the movie tab by selecting different camera walk-through paths and render the whole movie by introducing sound as well. But the best option is to render each clip separately and then merge them into a video with fade effects and sound at Adobe Premier.
- The final step is to do the Animated Phasing FX so as to render the exploded analysis of the mass timber structure as a construction layering process. In this case, we have to export each different element from Rhino as a Collada file. Then we import them to Lumion and set the position to Zero. We create a new clip and edit the animated phasing. We can select each element imported to Lumion and set parameters for the effects, such as “ground rise” and “pop in”, and give starting time, duration, staggering, and moving distance. Then we add phasing animation bars, set their starting point and do the same for the whole components. Additionally, we can create a mass move or advanced move to a custom object as Lumion doesn’t allow lateral movement. In our case, this is done for the mass timber 3D Volumentrics. Finally, we set the length of the clip at the edit tab and render the animated phasing.
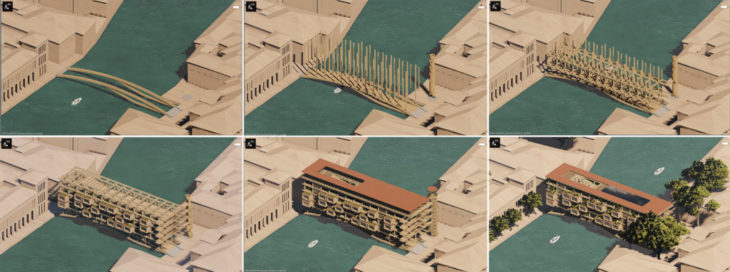
ANIMATED PHASING
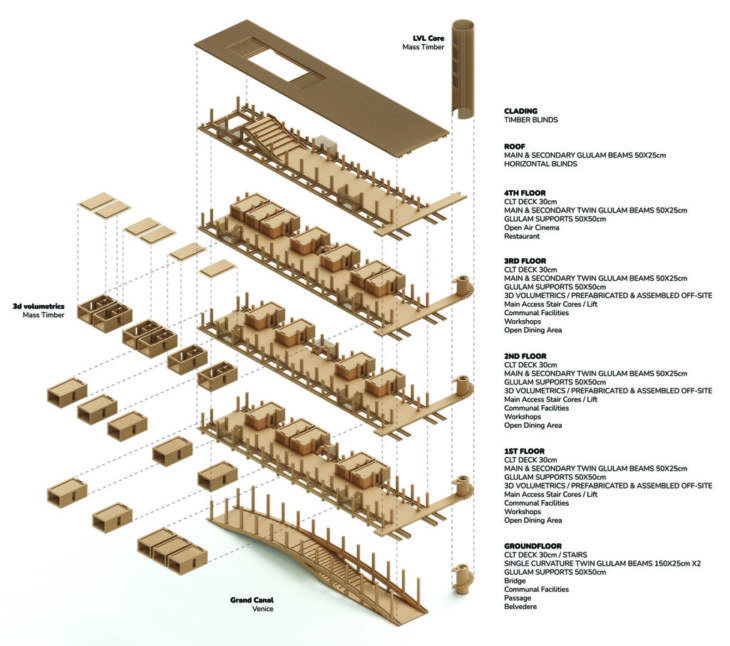
EXPLODED AXONOMETRIC
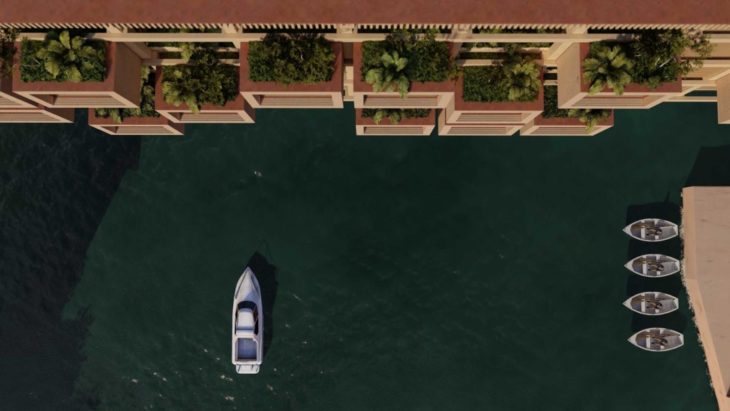
AERIAL TOP VIEW OF THE GRAND CANAL AND THE UNITS OF HABITATION
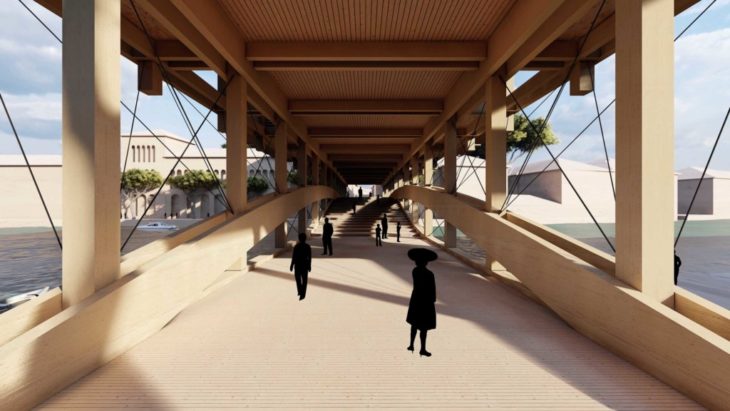
INSIDE THE MASS TIMBER GLULAM BRIDGE WITH OBVIOUS CORRECT TEXTURE OF STRUCTURAL WOOD GRAIN
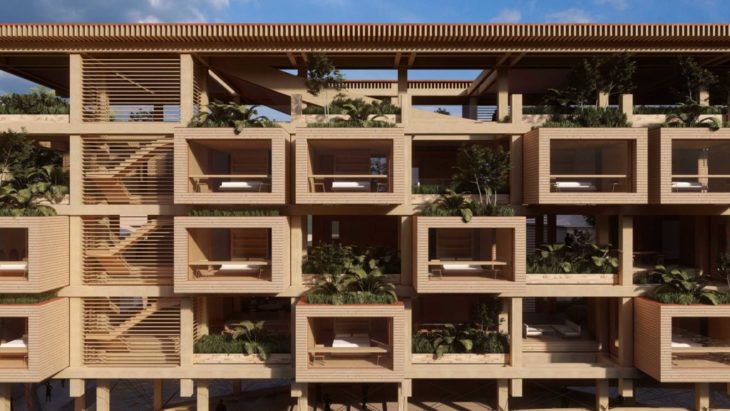
ELEVATION VIEW OF THE 3D MASS TIMBER 3D VOLUMETRICS
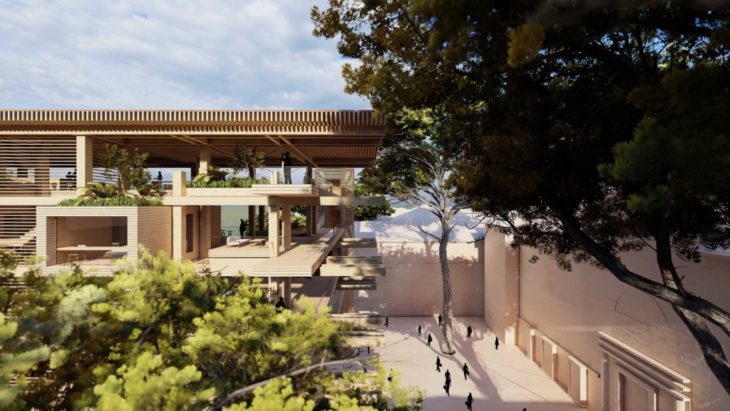
CORNER VIEW OF THE MAIN PLAZA WITH DEPTH OF FIELD IN THE FOREGROUND
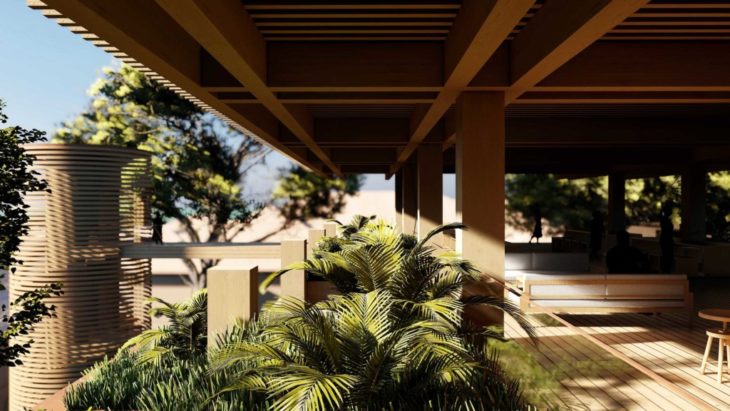
DETAIL OF VEGETATION WITH DEPTH OF FIELD IN THE BACKGROUND

SUNSET VIEW FROM THE OPEN-AIR CINEMA
—
Visualizing Mass Timber – Bridge Case Study is a project of IaaC, Institute for Advanced Architecture of Catalonia developed at Master in Mass Timber Design in 2021/2022 by Student: Alexandros Kitriniaris. Faculty: Firas Safieddine. Course: Tools 3