DRAWING BOT – HARDWARE II SEMINAR
During this seminar, MRAC 01 students worked on developing a mini Drawing Bot. The project is an addition to an already existing drawing bot OSTR (Open Source Turtle Robot) with the original repository through this link.
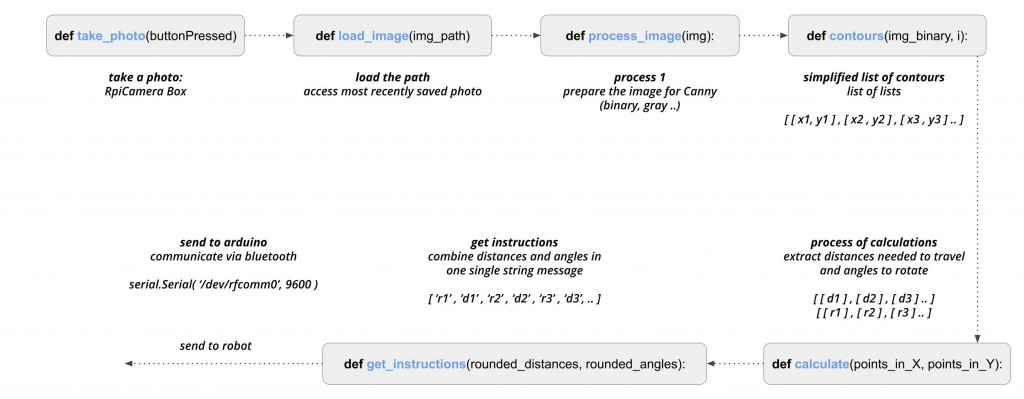
Throughout the seminar, the coding workflow was as followed:
(1) Step 1: Extract contours from an image
(1.1) Simplify the contours
(1.2) Output them as a list of lists (of coordinates in space)
(2) Step 2: Perform math operations on these lists to mimic motion tracing
(2.1) Output a string list from a py script
(2.2) Send it as a message for the robot
(2.3) Attempt to draw the contours of the initial image autonomously
(3) Step 3: Transcribe a set of commands from Arduino to the motors
(3.1) Define F as “Move Forward”, R as ‘Turn Right” followed by values
(3.2) Read string list line by line
(4) Step 4: Communicate with the Arduino on the Robot through a bluetooth module
(4.1) Receive feedback: ACK for “Message received properly”
(4.2) Receive feedback: DONE for “Finished performing sent command”
. STATE OF THE ART .
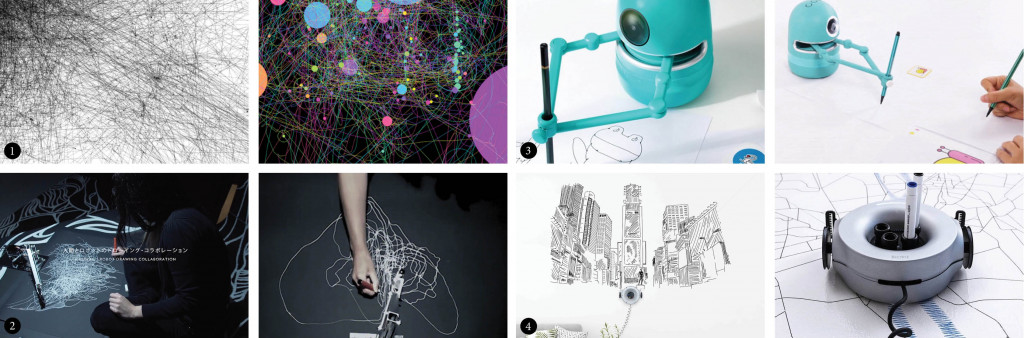
(1) Mouse Tracker: A program developed and executed as a website that tracks your mouse as soon as the website is initiated. You are able to created different sized circles based on the amount of time you press and hold the mouse.
(2) Sougwen Chung – Drawing Operations: An ongoing collaboration between an artist and a robotic arm. The project investigates ideas of automation, autonomy, and collaboration as an exercise in behavioral empathy.
(3) Quincy – The Robot Artist: This minibot uses a camera to see a picture and then translates the picture into an outline for it to draw.
(4) Scribit: Created by MIT professor Carlo Ratti, Scribit is a small ‘writing robot’ that can draw and text on any vertical surface.
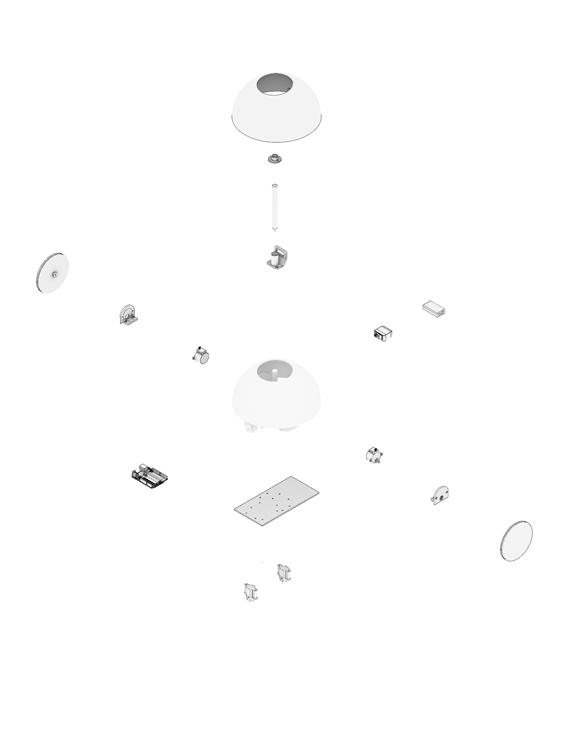
. FIRST PROTOTYPE : DRAWING BOT I .
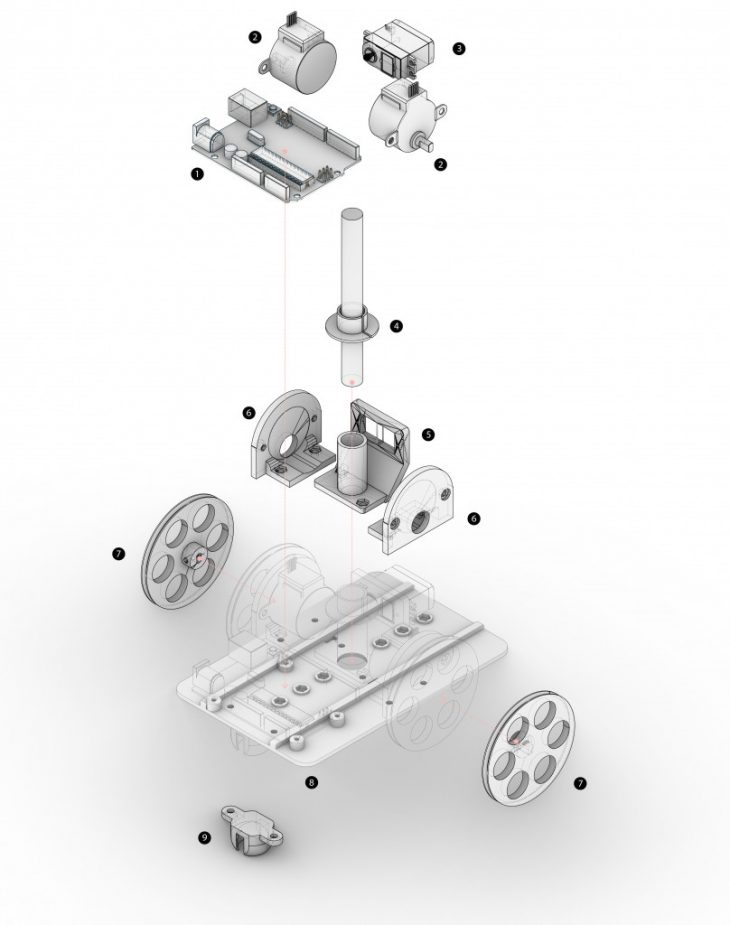 MODEL
MODEL
(1) Arduino Uno
(2) 28byj-48 Stepper Motor
(3) Mini Servo Motor
(4) Pen Holder
(5) Servo Motor Holder (Controlling the pen’s movement)
(6) 3D Printed Wheels
(7) 3D Printed Board
(8) Base Plate
(9) Ball Bearing Holder
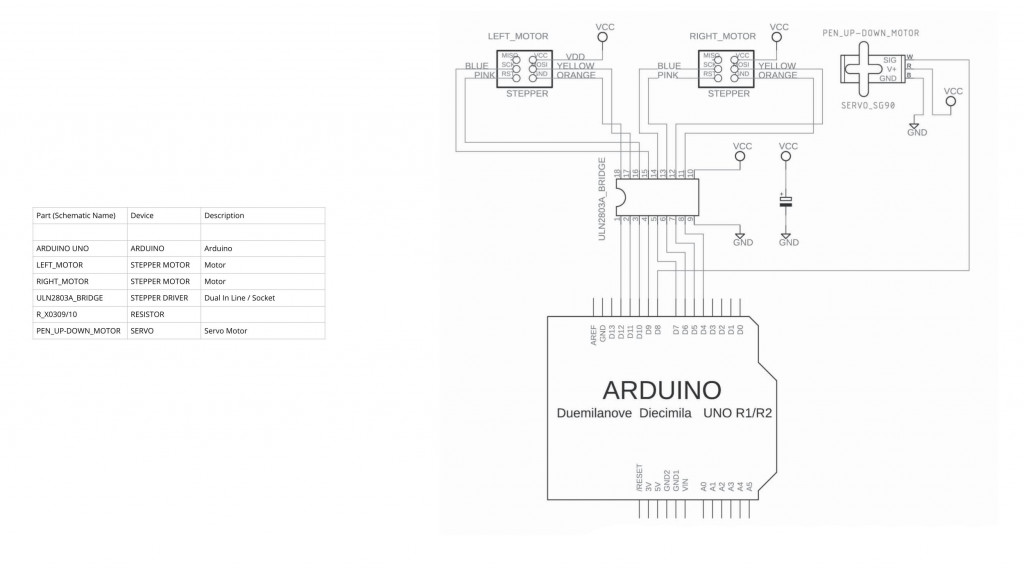
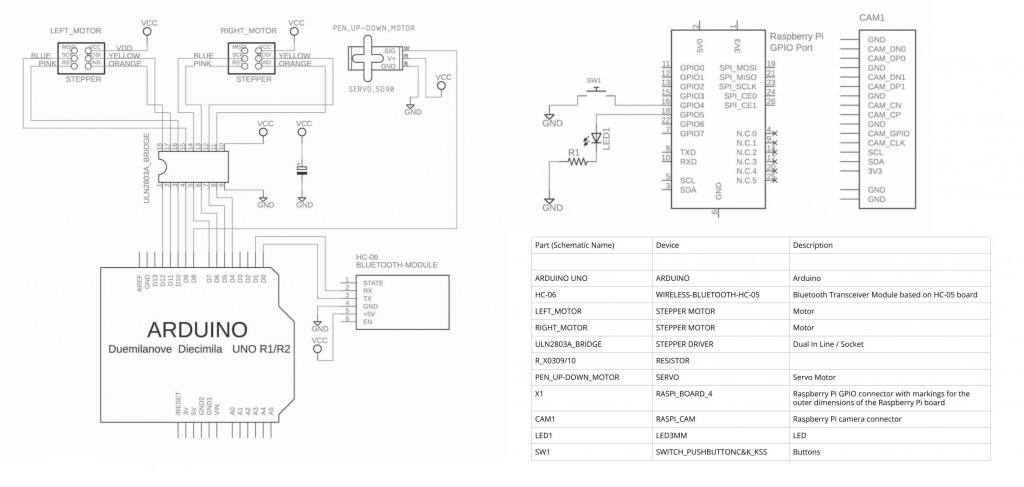
SCHEMATICS I
Autodesk Eagle electrical overview.
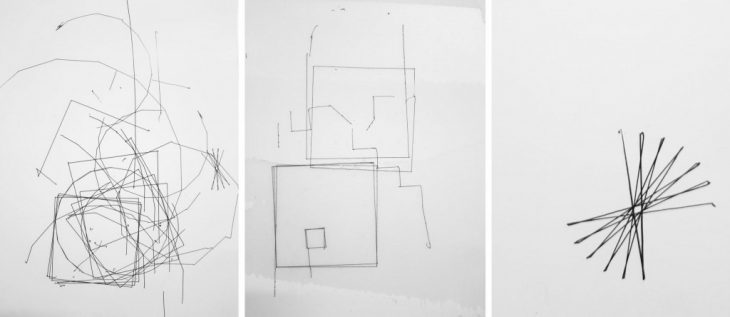
PRELIMINARY TESTS
On the left, the test are with a wrong calibration of the motors.
In the middle and on the right we started playing around with the input commands manually.
. SECOND PROTOTYPE : DRAWING BOT II .
PiCAMERA BOX
On the side, a piCamera connected to the raspberry pi is triggered using a touch sensor that is placed at the top of the box (2).
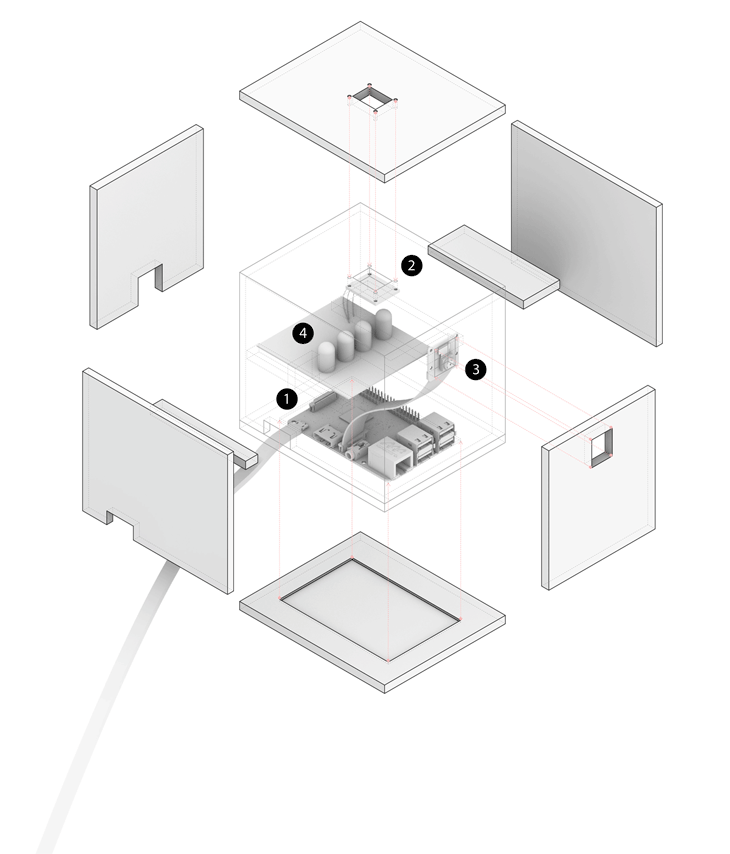
MODEL
(1) Raspberry Pi 4B
(2) Touch Sensor
(3) PiCamera
(4) Board of LEDs
SCHEMATICS II
Arduino UNO schematics remained the same as the first iteration, however we added a bluetooth module in order to communicate with the raspberry pi.
The raspberry pi has a picamera configured to take a picture using a touch sensor.
. SCRIPTS: ARDUINO AND PYTHON .
SCRIPTS WORKFLOW
From left to right: the arduino sketch with the movement instructions, the python script to read and write on the serial monitor, the communication extracted from the robot.
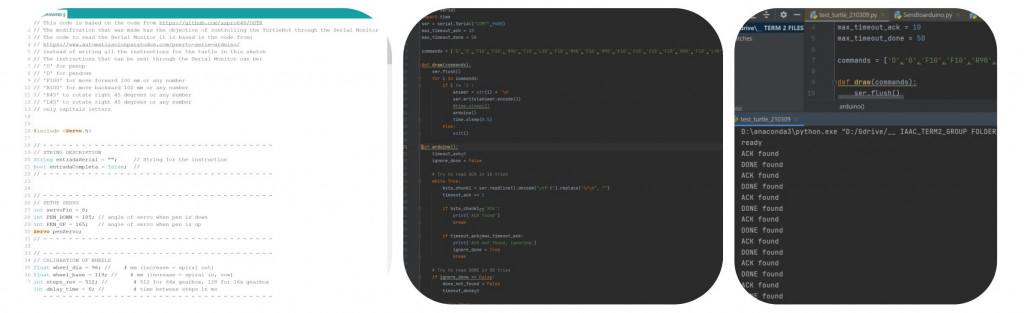
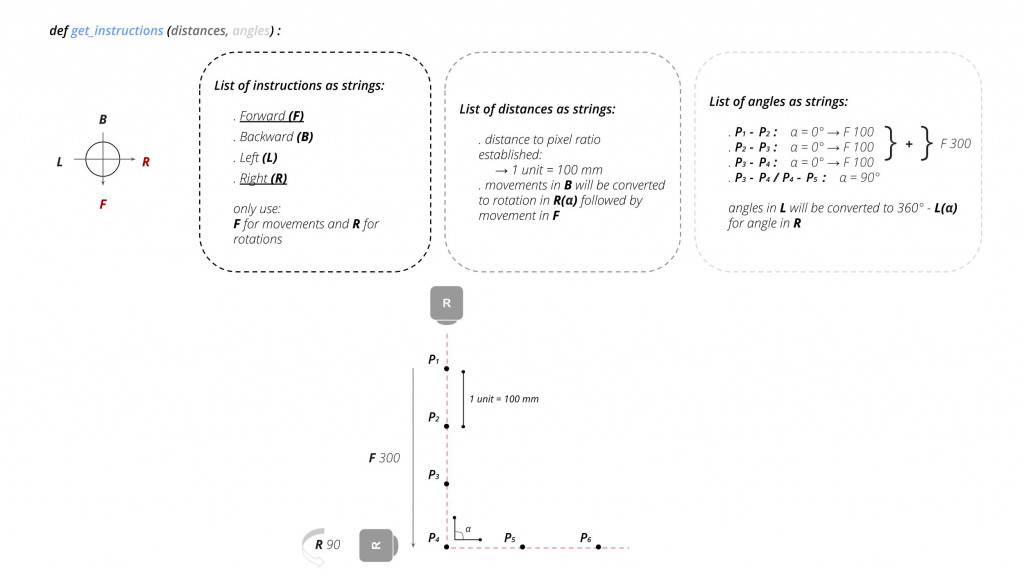
PYTHON SCRIPT
Logic of the code: translate the coordinates of the contours into a ‘language’ the drawing bot can understand.
PYTHON SCRIPT EXAMPLE
Main function breakdown.
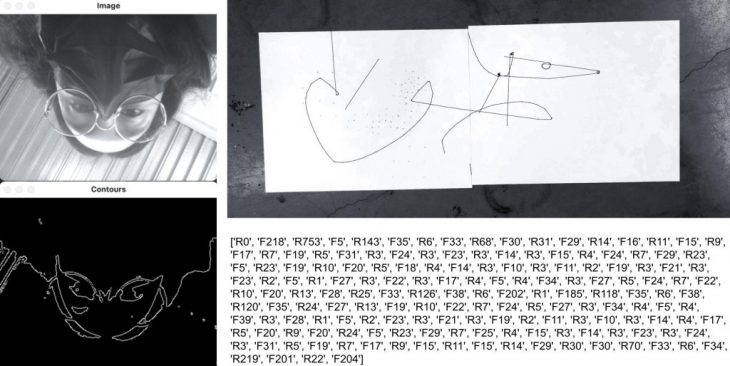
FINAL TESTS
Runs of the final script:
The raspberry pi sends a message to launch the script, takes the photo, creates the instructions and sends it to the arduino.
Result = abstract interpretation (Picasso inspired).

DRAWING BOT – HARDWARE II SEMINAR is a project of IAAC, Institute for Advanced Architecture of Catalonia developed at the Master in Robotics and Advanced Construction in 2020/2021 by:
Students: Aslinur Taskin, Helena Homsi, Juan Eduardo Ojeda
Faculty: Oscar Gonzalez
Faculty Assistant: Antoine Jaunard